Virtual Machine Installation
The installation of the test environment is performed on a KVM-based virtual machine.
Download Image
Useful sites for downloading qcow2 images:
For this case, we use the image obtained from the Red Hat Customer Portal, using the account created in Red Hat Developers.
Preparation of VM
-
Setting the qcow2 image
$ virt-customize -a vmlab01.qcow2 \ (1)
> --hostname vmlab01.rootzilopochtli.lab \ (2)
> --root-password password:rootpw \ (3)
> --ssh-inject 'root:file:labkey.pub' \ (4)
> --uninstall cloud-init \ (5)
> --selinux-relabel (6)
[   0.0] Examining the guest ...
[   8.4] Setting a random seed
[   8.5] Setting the machine ID in /etc/machine-id
[   8.5] Setting the hostname: vmlab01.rootzilopochtli.lab
[   8.5] SSH key inject: root
[   9.4] Uninstalling packages: cloud-init
[  11.3] Setting passwords
[  12.0] SELinux relabelling
[  22.1] Finishing off
-
Add disk image file
-
Set hostname
-
Set root password
-
Add ssh public key to the specified user
-
Uninstall useless initialization software
-
Due to the modification of several files, SELinux needs to be relabeled
Install the VM
-
Move the image disk to
/var/lib/libvirt/images:
$ sudo mv vmlab01.qcow2 /var/lib/libvirt/images/
-
Install the VM with the image disk (VM is imported):
$ sudo virt-install --name vmlab01 \ (1)
> --memory 1024 --vcpus 1 \ (2)
> --disk /var/lib/libvirt/images/vmlab01.qcow2 --import \ (3)
> --os-type linux --os-variant rhel8.4 \ (4)
> --noautoconsole (5)

Starting install...
Domain creation completed.
-
Set the VM name
-
Setting up resources for the VM
-
Import disk image as VM disk
-
Set OS type and variant
-
VM console is not required to be sent as output
Setting up the VM
-
Discover the VM’s IP:
$ sudo virsh domifaddr vmlab01
Name       MAC address          Protocol     Address
-------------------------------------------------------------------------------
vnet1      52:54:00:69:aa:90    ipv4         192.168.122.227/24
-
Access the VM with ssh key:
$ ssh -i labkey root@192.168.122.227
-
Subscribe the VM
As we use the RHEL image, we have to subscribe it with our Red Hat Developers login account to get packages and updates:
[root@vmlab01 ~]# subscription-manager register
Registering to: subscription.rhsm.redhat.com:443/subscription
Username: <Red Hat Developers Account>
Password: <Red Hat Developers Account Password>
The system has been registered with ID: 22b97e3b-b309-4c2e-9d71-04fc31084c1a
The registered system name is: vmlab01.rootzilopochtli.lab
-
Find and attach the subscription:
[root@vmlab01 ~]# subscription-manager list --available (1)
+-------------------------------------------+
    Available Subscriptions
+-------------------------------------------+
Subscription Name:   Red Hat Developer Subscription for Individuals
Provides:            dotNET on RHEL Beta (for RHEL Server)
                     Red Hat CodeReady Linux Builder for x86_64
                     Red Hat Enterprise Linux for SAP HANA for x86_64
                     Red Hat Ansible Engine
...output omitted...
Contract:
Pool ID:             8a85f9a076fc4a87017720f2b38a7277 (2)
Provides Management: No
Available:           12
Suggested:           1
Service Type:
Roles:               Red Hat Enterprise Linux Server
Service Level:       Self-Support
Usage:
Add-ons:
Subscription Type:   Standard
Starts:              01/20/2021
Ends:                01/19/2022
Entitlement Type:    Physical

[root@vmlab01 ~]# subscription-manager attach --pool=8a85f9a076fc4a87017720f2b38a7277 (3)
Successfully attached a subscription for: Red Hat Developer Subscription for Individuals
[root@vmlab01 ~]# subscription-manager role --set='Red Hat Enterprise Linux Server' (4)
role set to "Red Hat Enterprise Linux Server".
-
Get the list of available subscriptions
-
Pool ID
-
Attach the subscription
-
Set VM role
-
Adding Ansible repo:
[root@vmlab01 ~]# subscription-manager repos --list | grep ansible
Repo ID:   ansible-2.8-for-rhel-8-x86_64-debug-rpms
Repo URL:  https://cdn.redhat.com/content/dist/layered/rhel8/x86_64/ansible/2.8/debug
Repo ID:   ansible-2.8-for-rhel-8-x86_64-source-rpms
Repo URL:  https://cdn.redhat.com/content/dist/layered/rhel8/x86_64/ansible/2.8/source/SRPMS
Repo ID:   ansible-2.9-for-rhel-8-x86_64-rpms
Repo URL:  https://cdn.redhat.com/content/dist/layered/rhel8/x86_64/ansible/2.9/os
...output omitted...
[root@vmlab01 ~]# subscription-manager repos --enable ansible-2.9-for-rhel-8-x86_64-rpms
Repository 'ansible-2.9-for-rhel-8-x86_64-rpms' is enabled for this system.
-
Installing Ansible:
[root@vmlab01 ~]# dnf -y install ansible
Updating Subscription Management repositories.
Red Hat Enterprise Linux 8 for x86_64 - BaseOS (RPMs)           6.9 MB/s |  33 MB  00:04
Red Hat Ansible Engine 2.9 for RHEL 8 x86_64 (RPMs)             1.2 MB/s | 1.6 MB  00:01
Red Hat Enterprise Linux 8 for x86_64 - AppStream (RPMs)        7.5 MB/s |  30 MB  00:03
...output omitted...
  Verifying        : sshpass-1.06-3.el8ae.x86_64                                     1/3
  Verifying        : ansible-2.9.22-1.el8ae.noarch                                   2/3
  Verifying        : python3-jmespath-0.9.0-11.el8.noarch                            3/3
Installed products updated.

Installed:
  ansible-2.9.22-1.el8ae.noarch
  python3-jmespath-0.9.0-11.el8.noarch
  sshpass-1.06-3.el8ae.x86_64

Complete!
-
Update VM OS:
[root@vmlab01 ~]# dnf clean all
...output omitted...
[root@vmlab01 ~]# dnf update
...output omitted...
-
Reboot VM:
[root@vmlab01 ~]# reboot
Create Test Environment
Create User and grant privileges
-
Create
studentuser with supplementarywheelgroup:
[root@vmlab01 ~]# useradd student -G wheel
[root@vmlab01 ~]# passwd student
Changing password for user student.
New password: student
BAD PASSWORD: The password is shorter than 8 characters
Retype new password: student
passwd: all authentication tokens updated successfully.
|
Note
|
This allows the user to execute any command with
|
-
Add ssh key to
studentuser:
$ ssh-copy-id -i labkey.pub student@192.168.122.227
-
Log in to the VM and test the configuration:
$ ssh -i labkey student@192.168.122.227

Last login: Fri Jun  4 17:34:21 2021 from 192.168.122.1
[student@vmlab01 ~]$ sudo -l
Matching Defaults entries for student on vmlab01:
    !visiblepw, always_set_home, match_group_by_gid, always_query_group_plugin, env_reset, env_keep="COLORS DISPLAY HOSTNAME HISTSIZE KDEDIR LS_COLORS", env_keep+="MAIL
    PS1 PS2 QTDIR USERNAME LANG LC_ADDRESS LC_CTYPE", env_keep+="LC_COLLATE LC_IDENTIFICATION LC_MEASUREMENT LC_MESSAGES", env_keep+="LC_MONETARY LC_NAME LC_NUMERIC
    LC_PAPER LC_TELEPHONE", env_keep+="LC_TIME LC_ALL LANGUAGE LINGUAS _XKB_CHARSET XAUTHORITY", secure_path=/sbin\:/bin\:/usr/sbin\:/usr/bin

User student may run the following commands on vmlab01:
    (ALL) NOPASSWD: ALL
-
Install
pip
[student@vmlab01 ~]$ sudo dnf install python3-pip
Ansible + Google
Ansible contains modules for managing Google Cloud Platform resources, including creating instances, controlling network access, working with persistent disks, managing load balancers, and a lot more.
Install requisites
The GCP modules require both the requests and the google-auth libraries to be installed:
[student@vmlab01 ~]$ sudo dnf list python*-requests*
Updating Subscription Management repositories.
Last metadata expiration check: 0:11:09 ago on Fri 04 Jun 2021 05:20:48 PM EDT.
Installed Packages
python3-requests.noarch           2.20.0-2.1.el8_1          @System
...output omitted...
[student@vmlab01 ~]$ sudo pip3 install --user student requests google-auth
Requirement already satisfied: requests in /usr/lib/python3.6/site-packages
Collecting google-auth
...output omitted...
Installing collected packages: pyasn1, rsa, cachetools, setuptools, pyasn1-modules, google-auth
Successfully installed cachetools-4.2.2 google-auth-1.30.1 pyasn1-0.4.8 pyasn1-modules-0.2.8 rsa-4.7.2 setuptools-57.0.0
-
Create a Work directory
In order to store the required files, create a working directory and switch to it:
[student@vmlab01 ~]$ mkdir workdir && cd workdir
Test GCP Ansible modules
-
Install
git:
[student@vmlab01 ~]$ sudo dnf install git
-
Clone
ansible-gce-apache-lbrepo:
[student@vmlab01 workdir]$ git clone https://github.com/AlexCallejas/ansible-gce-apache-lb.git
Cloning into 'ansible-gce-apache-lb'...
remote: Enumerating objects: 22, done.
remote: Total 22 (delta 0), reused 0 (delta 0), pack-reused 22
Unpacking objects: 100% (22/22), 4.50 KiB | 328.00 KiB/s, done.
-
Create a RSA ssh key
By default, Google Compute Engine (GCE) adds the ssh-keys of the platform itself; as we need to perform some post-creation tasks, a ssh key is required.
[student@vmlab01 workdir]$ ssh-keygen -t rsa -b 4096 -f gcekey
-
Create a test instance
Switch to ansible-gce-apache-lb directory and modify the gce-test.yml playbook with your GCE credentials:
---
- name: Playbook test to create gce instance
  hosts: localhost
  connection: local
  gather_facts: no

  vars:
    service_account_email: <gce service account email> (1)
    credentials_file: <path to json credentials file> (2)
    project_id: <project id> (3)
    machine_type: n1-standard-1 (4)
    image: centos-stream-8 (5)

  tasks:
    - name: Launch instances
      gce:
        instance_names: dev (6)
        machine_type: "{{ machine_type }}"
        image: "{{ image }}"
        service_account_email: "{{ service_account_email }}"
        credentials_file: "{{ credentials_file }}"
        project_id: "{{ project_id }}"
-
In the JSON file it is found as
client_email -
For this case:
/home/student/workdir/<JSON file> -
In the JSON file it is found as
project_id -
On the GCP console (menu:Compute Engine[VM Instances > Create an instance]) review available options
-
On the GCP console (menu:Compute Engine[VM Instances > Create an instance]) review available options
-
VM Instance name
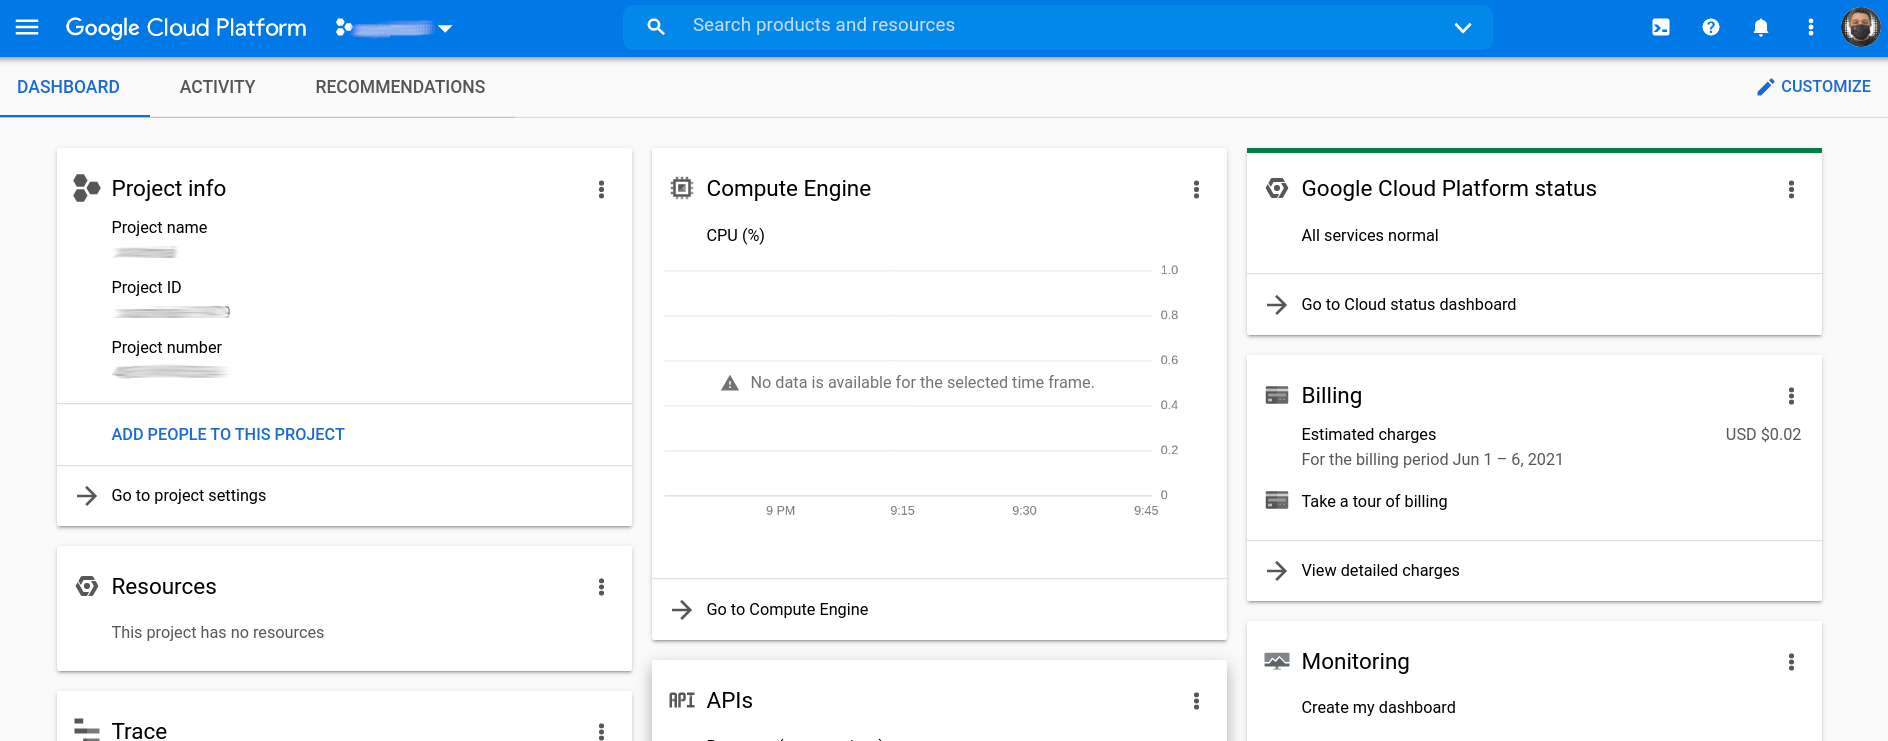
Validate in the GCP console that there is no VM instance created:
Run the gce-test.yml playbook:
[student@vmlab01 ansible-gce-apache-lb]$ ansible-playbook gce-test.yml

PLAY [Playbook test to create gce instance] ********************************************************

TASK [Launch instances] ****************************************************************************
changed: [localhost]

PLAY RECAP *****************************************************************************************
localhost  : ok=1    changed=1    unreachable=0    failed=0    skipped=0    rescued=0    ignored=0
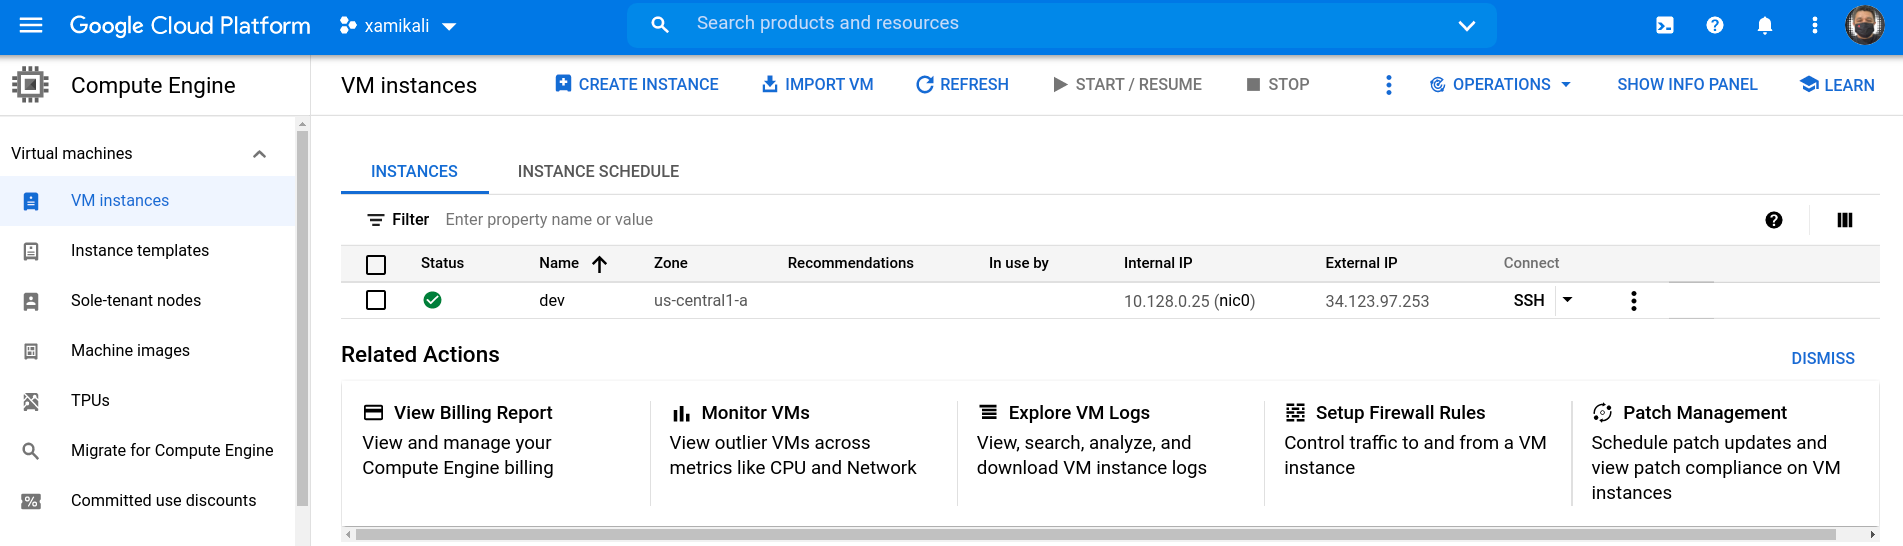
Confirm the creation of the VM instance in the GCP console (menu:Compute Engine[VM Instances]).
Click the btn:[VM Instance] name and then click btn:[DELETE] to delete the instance.
Create a Load-Balanced Web Service

Configuring GCE Credentials in Ansible Playbooks
Modify the ansible-gce-apache-lb playbooks with your GCE credentials:
...output omitted...
vars:
  service_account_email: <gce service account email> (1)
  credentials_file: <path to json credentials file> (2)
  project_id: <project id> (3)
...output omitted...
-
In the JSON file it is found as
client_email -
For this case:
/home/student/workdir/<JSON file> -
In the JSON file it is found as
project_id
Create GCE Instances
-
Add the RSA ssh key to
gce-apache.ymlplaybook
...output omitted...
- name: Create instances based on image {{ image }}
  gce:
    instance_names: "{{ instance_names }}"
    machine_type: "{{ machine_type }}"
    image: "{{ image }}"
    state: present
    preemptible: true
    tags: http-server
    service_account_email: "{{ service_account_email }}"
    credentials_file: "{{ credentials_file }}"
    project_id: "{{ project_id }}"
    metadata: '{"sshKeys":"<gce_user:ssh_pubkey>"}' (1)
  register: gce
...output omitted...
-
The format of the metadata should be something like:
student:ssh-rsa AAAAB3NzaC1yc2EAAAADAQABAAACAQCc3JcGt+BAunQPmm04gCQbF5x9po …"}'
|
Note
|
To configure the user of the instances in the GCE console, follow the note at Managing access to VM Instances → Setting up OS Login from Compute Engine Documentation. |
-
Run the
gce-lb-apache.ymlwith the RSA ssh key file:
[student@vmlab01 ansible-gce-apache-lb]$ ansible-playbook gce-lb-apache.yml --key-file /home/student/workdir/gcekey
|
Warning
|
If this process ends with errors, the instances created must be deleted, to avoid any charges in GCP. Run the
|
-
Confirms the creation of balanced web instances in GCE:
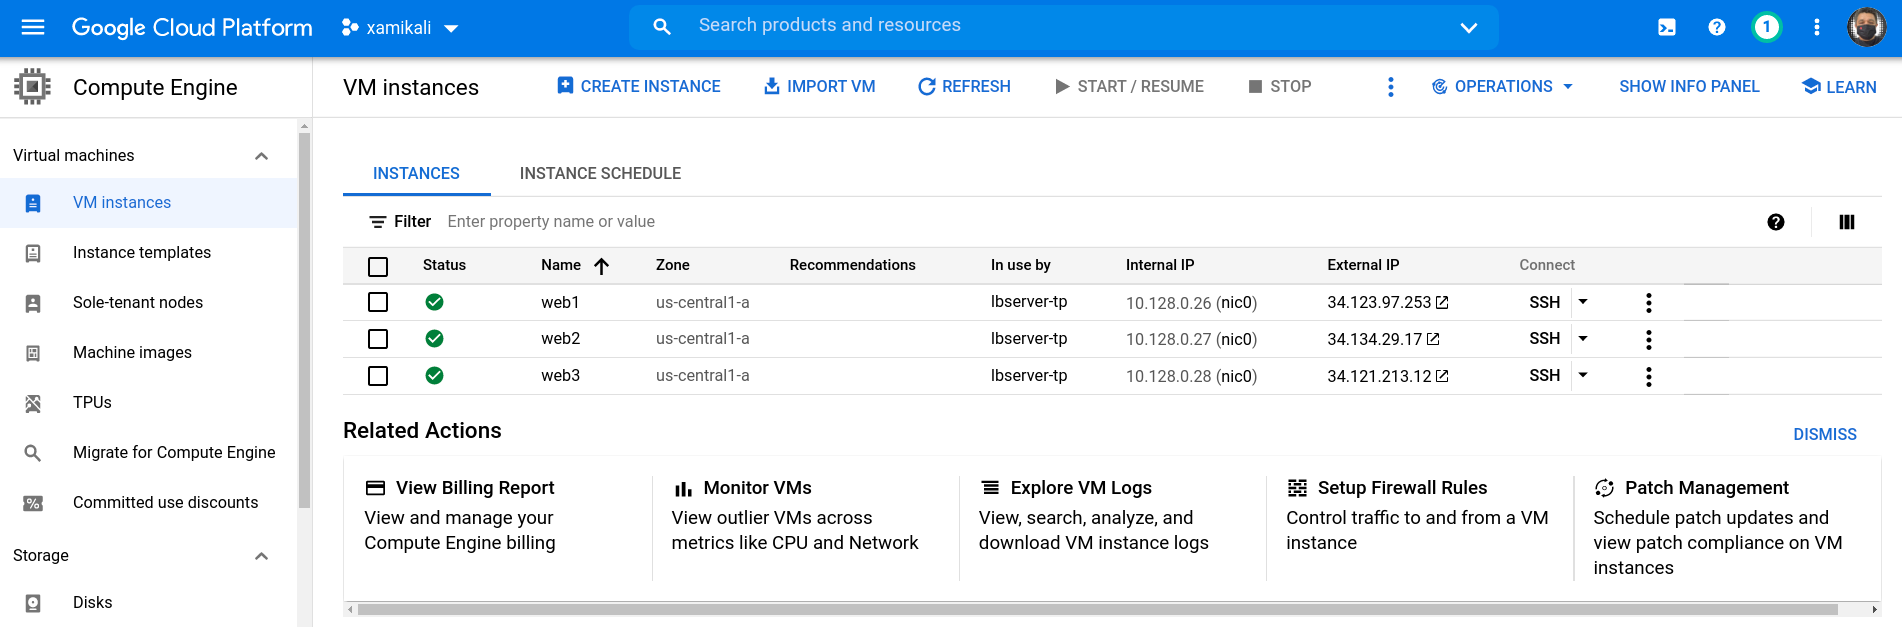
-
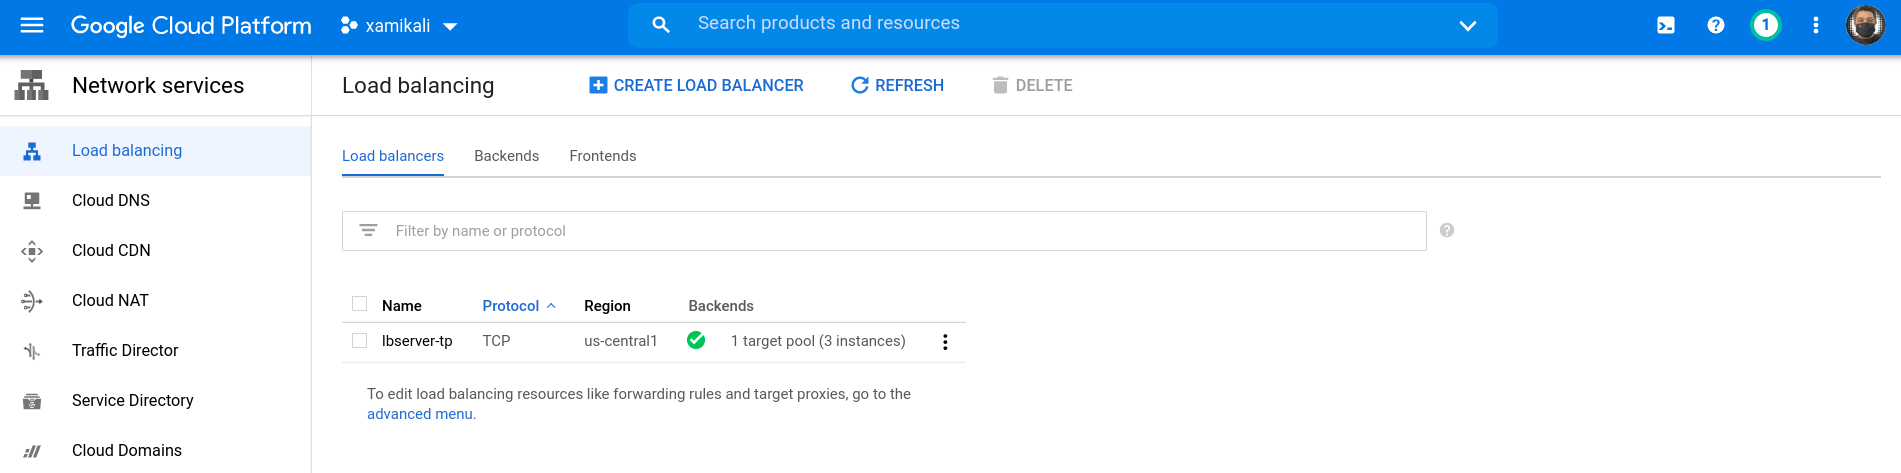
Confirms the creation of load balancer instance in GCE
On the GCP console (menu:Network services[Load balancing])
Test GCE Load Balanced Web Instances
To validate that the balancing is working correctly run curl to the public IP address of the load balancer instance and confirm that it responds with the public IP address of each web instance:
[student@vmlab01 ansible-gce-apache-lb]$ curl http://34.122.219.159 (1)
<!-- Ansible managed -->
<html>
<head><title>Apache is running!</title></head>
<body>
<h1>
Hello from 34.123.97.253 (2)
</h1>
</body>
</html>
[student@vmlab01 ansible-gce-apache-lb]$ curl http://34.122.219.159
<!-- Ansible managed -->
<html>
<head><title>Apache is running!</title></head>
<body>
<h1>
Hello from 34.134.29.17 (3)
</h1>
</body>
</html>
[student@vmlab01 ansible-gce-apache-lb]$ curl http://34.122.219.159
<!-- Ansible managed -->
<html>
<head><title>Apache is running!</title></head>
<body>
<h1>
Hello from 34.121.213.12 (4)
</h1>
</body>
</html>
-
Load balancer public IP address
-
Web instance
web1public IP address -
Web instance
web2public IP address -
Web instance
web3public IP address
|
Warning
|
On completion of testing, remove balanced web instances to avoid GCP charges. Run the
|
|
Note
|
This guide is based on my article published in the Red Hat TAM Blog: Creating a load-balanced web service on cloud with Ansible. Alex Callejas | rutil.io/social | 2018 |